

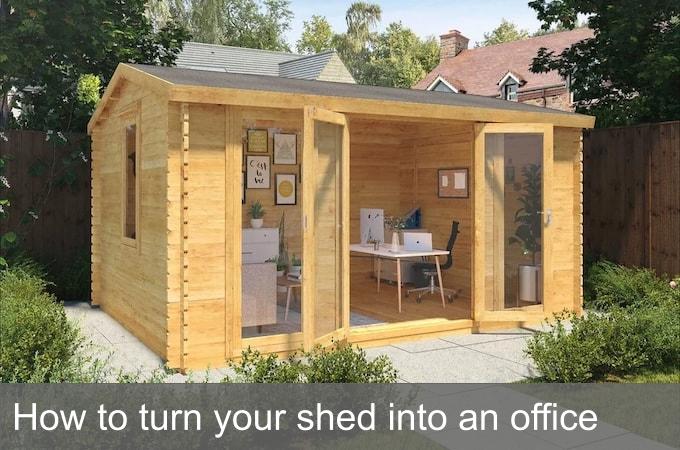
Want to work from home but don’t have a dedicated space? Converting your garden shed into an office could be the ideal solution. Transforming a little-used outdoor structure into a convenient work space will help balance your home and work life, as well as being cheap to run. If it’s your own business, you’ll also save a packet on office rental.
For a step-by-step guide to converting your humble garden shed into an organised office, follow this guide for expert tips.
Contents:
- Create a list of uses and requirements for your garden office
- Design the layout of your new office
- Assess the state of your existing shed
- Plan your job list
- 10 steps to convert your shed into an office
- How to convert your shed into an office – quick summary
Create a list of ‘uses’ and ‘requirements’ for your garden office

The kind of office you want will depend on the kind of work you do. So think about how you will use the space, and what those uses mean you’ll need. Make a list of:
- Uses - what you will need to use your office for.
- Requirements - what those uses require.
For example, if you plan to use your office for computer-based work, you will require mains electricity to be wired to your shed. You’ll also require a strong internet connection, and extra security measures for times when you are not working in it. Once you’ve made a list of Uses, it’s easier to think about Requirements. Here are some things to consider:
- Furniture, storage, and accessories: Your requirements list will be easy to complete once you know how you’ll use your office. For example, if you’re a graphic designer, you’ll want to sketch, draw and work on your projects (Uses), meaning you’ll need a desk, plenty of light, and a comfortable desk chair, unless you use a standing desk (Requirements). Will you have a lot of paperwork, prototypes, or other items from your current office to rehome? Or do you work best in a minimalist environment? Think about how you’ll use the space. Will you want a fridge and a kettle for refreshments? Do you think you’ll be at your desk the majority of the time you’re in the office? Or would a separate seating area for breaks or meetings be appropriate?
- Utilities: Electricity, heating, and internet access are necessities in a modern office. Refer to your Requirements lists to calculate how many power sockets you’ll need for your utilities (heaters and lighting) and office equipment (computers, printers, scanners, etc.). What kind of lighting will your work require? Is a strip light enough, or do you need spots and lamps? Do you want the office to be self-contained, with a bathroom and mains water access? How will you connect to the internet?
- Design: Assuming your office will be used on a regular basis year-round, the shed should be thoroughly insulated, weather-proofed and connected to utilities. A wooden shed is a good choice because it can be altered to allow for those needs, including adding bigger windows or extending it to include a bathroom. The exterior of a wooden shed - usually either overlap or tongue and groove cladding - should also be taken into consideration. Overlap is a cost-effective option, but tongue and groove is considered to be stronger, and has better weather-resistant properties. For more detail on different types of wooden sheds, see the full range of wooden sheds at Waltons.
- Base: A working office shed will require a strong, reliable base. Larger sheds need a solid, concrete base. The same applies if you will be using your office to store heavy items as part of your business. A smaller/lighter weight shed, on the other hand, can sit on a paving slab base. It’s fairly cheap and easy to install (and later remove), especially when compared with concrete bases. But be realistic about the size and weight of your shed; a paving slab base is liable to sink over time. Timber decking with concrete anchor points is a stylish option, as decking can be extended to create an outside area. While this kind of base helps with damp proofing by allowing air to circulate, the extra decking does increase costs. It also won’t support a larger shed.
- Position: The position of your shed often depends on where you have space in your garden. When determining this, add a few extra inches to the size of your shed. You will need this space when digging out for the base, as well as for construction and maintenance. Check the condition of the site’s immediate surroundings. Are there any young trees, overhanging branches or mature shrubs that could obstruct light or access to your office in the future? Consider as well how far the office will be from the main house. While some distance is important to ensure a peaceful working environment, the further away it is, the more it will cost when it comes to laying cables for the electricity and connecting the other utilities. Your home’s existing WiFi, for example, may not extend that far.
- Ventilation: Whether your work necessitates proper ventilation or not, a good supply of fresh air is important in a space you spend considerable amounts of time in. A ventilation shaft or windows that open are easy options to consider. But if you don’t have (or don’t want) windows, consider installing a skylight, and an extractor fan to provide the ventilation. The benefit of having no windows? You’ll shield any expensive kit, such as computers, from view.
- Aspect: Take the quality of light into account when deciding which direction you want your office to face. South-facing windows offer direct sunlight, for example, while indirect light from the north causes fewer shadows. This makes it easier to see what you’re doing; hence why artists’ studios face north. If your desk or main working area will be near a window, consider the view and direction of the light. You’ll probably spend a large amount of time sitting in front of it. Take some time to check if the view from your home is also acceptable.
Design the layout of your new office
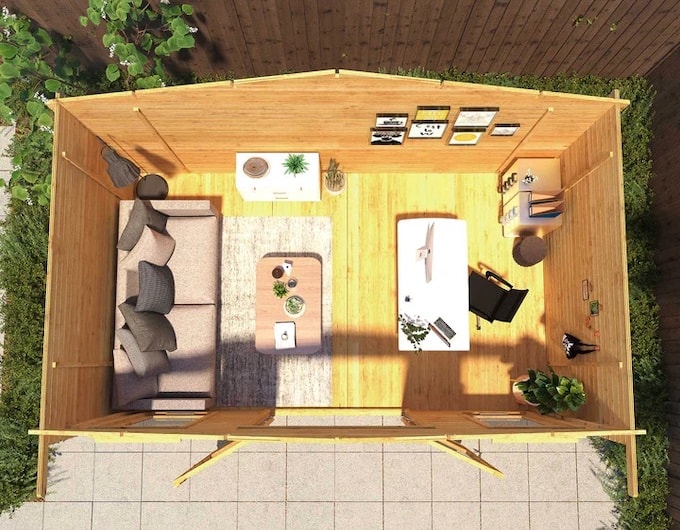
Image: The Silver 5m x 3m Log Cabin from Waltons
With your list of ‘Requirements’ to hand, start planning your new office layout. You’ll need to make sure that everything fits. Try using one of the following methods:
- Google Draw. This free software will help you create a to-scale version of the shed and its proposed contents, which you can quickly and easily adjust.
- Room Planning Software. There are plenty of free online room planners, but Floor Planner or Sketchup are good places to start. You can work in 2D or 3D, set room size, and position and scale furniture and equipment.
- Paper. Go analogue and make a scale drawing of your empty shed. Then make scale versions of your furniture to move around and arrange.
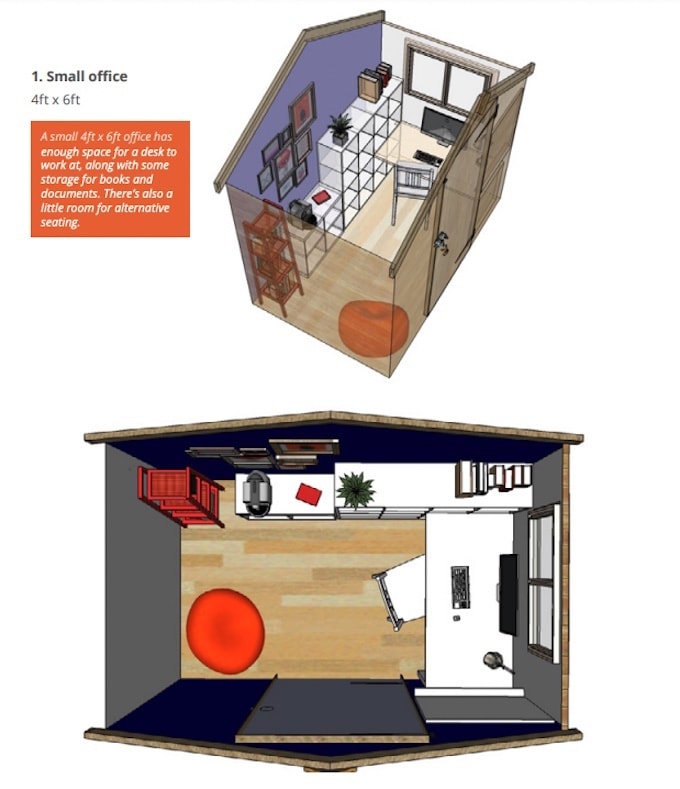
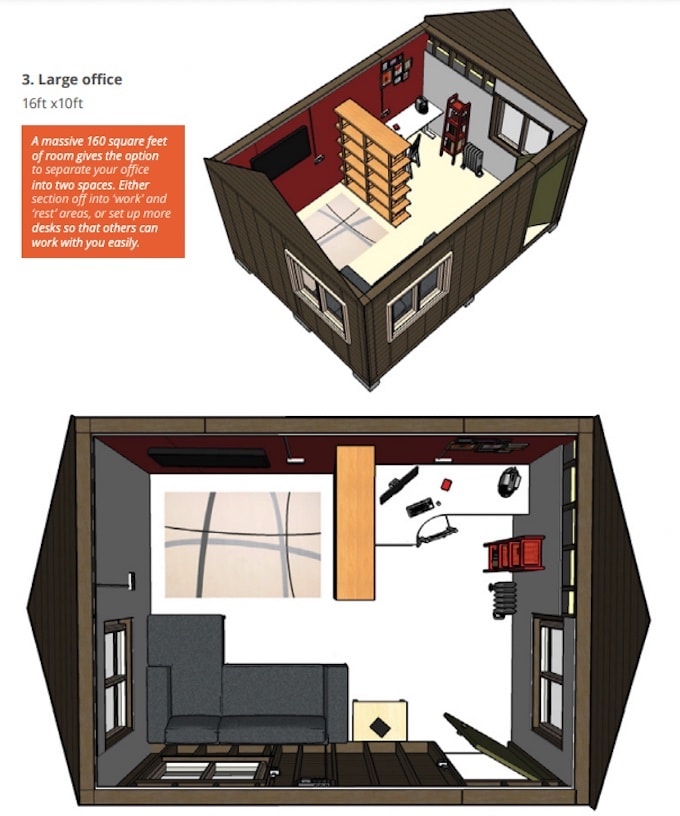
At this point you can experiment with moving or enlarging the doors and windows. You can even try different layouts, and look at different size sheds. But if your Requirements don’t fit, trim the list or plan for a bigger shed. Just be realistic: leave yourself enough room to move around and work. On the following pages are three example shed layouts (made with Sketchup) for different sized sheds:
- Small (4ft x 6ft)
- Medium (10ft x10ft)
- Large (16ft x10ft)

Assess the state of your existing shed
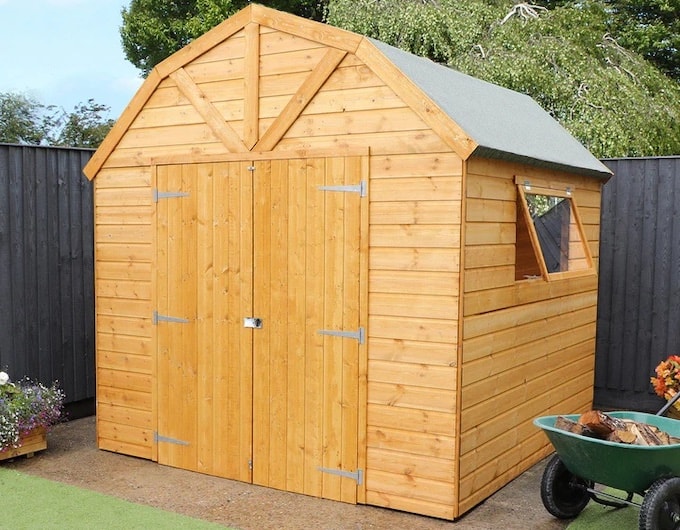
Image: 8 x 8 Premium Shiplap Dutch Barn from Waltons
You should now know exactly what you want from your office. It’s time to see if your current shed is up to the job. Empty it out completely and check for any visible damage, including subsidence, leakage or mould. Test the doors and windows. Do they work properly? Are there any visible gaps? Check the roof and its felt - is it intact?
If you’re keeping the shed, deal with any maintenance issues before you begin the conversion. You also need to check the base. Will it be strong enough to support the contents of your office? Or will you need to replace it with a concrete base?
Take a look at your chosen site. Ideally, the ground will be level. But if there is a slight slope, consider using timber and bricks to level it out. Or cut into the slope and build a retaining wall at the back. This can be a DIY job, but to ensure the stability of this kind of levelling work, you may want to consult a builder.
Plan your job list
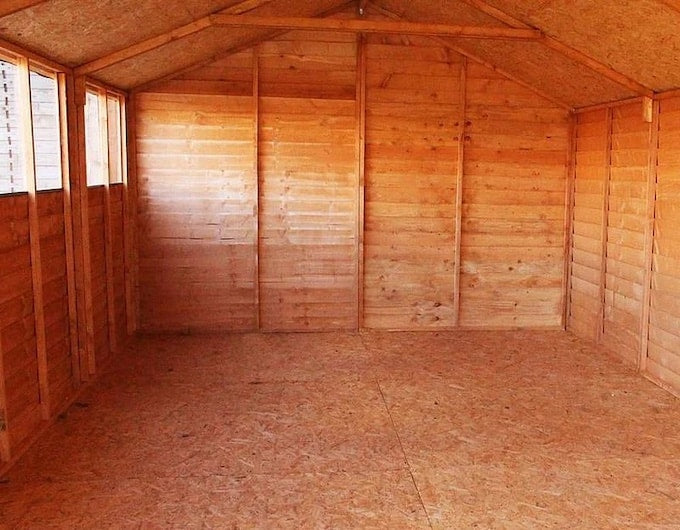
Image: 15 x 10 Overlap Double Door Apex Garden Workshop from Waltons
A job list is a useful project management tool, which should help the conversion progress smoothly and efficiently. If project management is new to you, just use this simple DIY version:
- Open a new spreadsheet and list every job that needs doing during the conversion.
- Add columns for: How long you think each job might take and who’s doing the job.
- Arrange the jobs in priority order.
- Add columns for: Preparation; then each day of the work (Day 1, day 2, day 3, etc.) Day 1 is the day that your conversion starts.
- For each job, colour the cell of the day you plan to work on it.
- Mark jobs that need doing before work on the shed starts in the preparation column. For example: ‘Buy new shed’.
- Swap out “day 1” and “day 2” for the actual dates when you know them.
With this spreadsheet you’ll be able to track your progress and book professionals (and collect supplies) for the right days. We’ve designed a project management template that you can copy for your own planning.
10 steps to convert your shed into an office
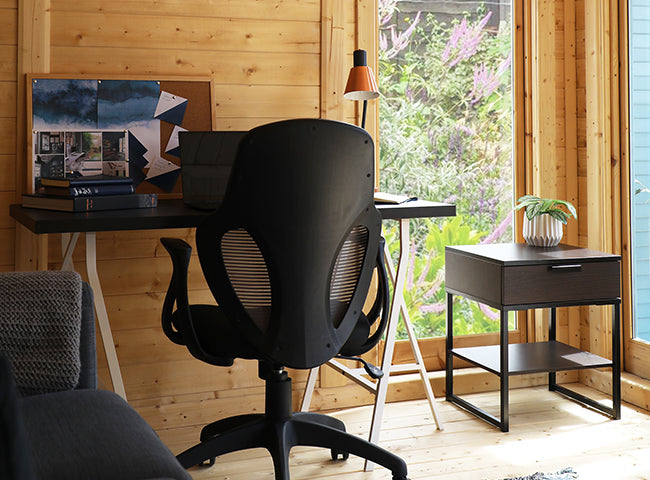
Image: Waltons
Once you’ve completed the planning phase, it’s time to get to work. To create a warm and comfortable office space, your shed will need to be well insulated, free from damp, connected to utilities and decorated. Here’s a list of things you’ll need to do:
1. Damp-proofing
Damp has a number of causes, but there are some simple preventative measures:
- Ensure no shrubs or tree branches press against your shed.
- Regularly check the integrity of your roof felt.
- If you have a solid concrete base, install a damp-proof membrane.
- Fill any gaps in the shed’s window and door frames with an expanding, hardening foam filler or liquid wood.
- Paint or treat the exterior wood with preservative.
- Include a vapour barrier (or breathable membrane) when you insulate the shed.
- Fit the shed with appropriate heating and ventilation (see below for more details).
- You can also use a dehumidifier if damp becomes a problem.
2. Insulation
Proper insulation will help keep your office in good working order, and add another layer of damp-proofing. Many forms of insulation also have sound-proofing properties, which is useful if you enjoy working with loud music on. Insulating the ceiling, floor and walls of the shed will give your office the best coverage. This can then be covered with ply, plasterboard or tongue and groove. To insulate the walls:
- Plain or foil-coated bubble wrap is a cheap and simple form of insulation. However, it’s not the most effective for this job. Consider alternatives.
- Glass (or fibreglass) and mineral (or rockwool) can also be cut to size and easily installed. Good thermal insulation and soundproofing. Cover your eyes, mouth and nose properly when installing, and wear gloves.
- Foam insulation boards. More expensive, but very thermally efficient. Can be used for floors, as well as walls. Brands to look out for include Kingspan and Celotex. Each board must be cut to size, allowing for sockets and wiring.
Floor – Foam boards are effective insulators. But a breathable membrane topped with a rug (or a carpet off-cut) is a cheaper, make-do measure.
Ceiling – When fitting ceiling insulation, leave a gap between the insulation and the roof to let moisture escape. Popular options include natural and sustainable insulation, like sheep’s wool or hemp. These are flexible, which makes them easier to install, and breathable which can help prevent damp. Alternatively, try glass and mineral wool (same as for walls).
3. Electricity
You’ll need a trench at least 50cm deep from your house to the shed to run the wiring for mains electricity. You could undertake electrical installation yourself, but a certified professional will need to sign off on your work for insurance purposes. It may well be more straightforward to engage an electrician from the start. When your local spark arrives, speed up the process by providing the following:
- The number (and location) of power sockets and light switches
- Details of the equipment you’ll be running on the new system
- The location of your fuse box
But if your daily work doesn’t require much electricity (for example, if you are an illustrator who draws by hand), you could opt for solar or wind power. However, keep in mind that this is not as reliable as mains, particularly during the winter months.
4. Lighting
The right shed lighting will help you work regardless of the weather or time of day. Pick from the following:
- Lamps. Either floor or desk lamps. Cheap, no installation costs, and easy to move. Can also be decorative and eco-friendly, using the right bulbs.
- Fluorescent overheads. Useful if you want bright light across your whole office. Fairly cheap and energy efficient.
- Halogen. Bright light, good choice for adjustable spotlights and track lighting.
- LED lighting. Cheap to run, versatile, and - like halogen bulbs - good for use in spotlights, when you want brighter light in certain areas, like your desk.
5. Heating
Heating your new office will make sure that it is a comfortable, pleasant place to work all year round. It will also help prevent your paperwork, electronics and furnishings from becoming damaged by damp.
Keeping your shed above the dew point (the point at which moisture condenses on cool surfaces) shouldn’t cost too much if the shed has been properly insulated. These are some heating options to contemplate:
- Electric radiator. Wall-mounted, which can take up precious storage space. Otherwise, safe, convenient and cheap (especially with a thermostat).
- Tube heater. Thin, tubular heaters that take up very little space. Plugged into a wall socket, they are cheap and safe.
- Underfloor heating. Often requires less heating than standalone heaters and spreads a steady temperature across the shed. But more expensive to install and repair (could require the floor being pulled up).
- Wood stove. A great source of potentially carbon-neutral heat. This should be installed by a professional, and have a vent, flue, and thorough fire-proofing, which can be expensive.
- Electric heater or portable radiator. Will give a quick, safe blast of heat, but it may not extend to all areas of your office, leaving your belongings at risk of damp.
- Electric convection heater. Freestanding or wall-mounted, these are cost-effective. Can feature thermostats and (as any plug in heater can) timers.
- Halogen heater. Halogen heaters are an inexpensive and efficient way to heat your shed. Can be stored away when not in use.
Portable gas and paraffin heaters, while powerful, can also make windows and walls stream with condensation. This can cause damp problems, and damage the structure and the contents of your office.
6. Internet
There are several ways to connect your office to the internet:
- Tether your mobile phone to your laptop to use your mobile’s signal and data.
- Home WiFi. The further you are from the house, the weaker the signal will be.
- WiFi Extender to boost your home WiFi signal up to 30 metres.
- Powerline Adapter. This is the most reliable form of internet access, but also the most expensive. It creates a second network, built on your home’s existing system. Once it’s set up, the new WiFi signal will come from an adapter plugged into a socket in your office.
7. Water
There are two ways to get water to your shed:
- New water pipes connected to the mains. You’ll need to dig a trench at least 75cm deep in order to lay the pipes (both clean and waste water). While this trench will be similar to the one for the electrical cables, the two must be separate and at a distance from each other. Consult a plumber for any work involving the mains, especially if you’re considering adding a bathroom to your shed. The further you are from the main house, the more expensive it may be to install a toilet. An eco toilet is a good alternative. “Dry” or “composting” toilets look the same as conventional counterparts, but use filtering or incineration systems.
- Guttering and a water butt. A water butt won’t provide drinking water, but is perfect if you need water for plants. Simple plastic guttering collects the water from the roof of your shed (an additional weatherproofing measure) and directs it to the water butt. Many systems come as a kit.
8. Security
Your office equipment, particularly any computers or electrical goods, could make you a target for thieves. Consider investing in some (or all) of the following security measures to protect your shed and its contents:
- Alarm. Add your office to your existing home alarm system, or install an independent alarm.
- Motion-sensitive security lights. These often deter would-be thieves.
- Laminated glass windows. Stronger than typical glass, this won’t smash if hit with a heavy object like a brick.
- Curtains or blinds. Hide your valuables to prevent opportunistic break-ins.
- Sturdy locks and reinforced doors. Reinforce your shed door with sheet metal, especially the area behind the lock.
- Hinges. Fit secure hinges. Regardless of the strength of a lock, thieves could simply unscrew your window or door hinges to gain access. Use coach bolts with rounded heads and make life harder for criminals.
- Hide your valuables. Use secure storage inside your shed office.
- Lock. Rim locks are stronger and more secure than a hasp and staple. Using too many locks can be a signal to would-be thieves that there’s something worth stealing behind them.
- Garden. The harder your garden is to get into, the more burglars will be deterred
9. Storage
There are many options when it comes to office storage solutions. Here are some to consider:
- Shelves (on walls and in corners) for books, box files, etc.
- Open shelving unit (saves mounting on wall, but provides strong support for heavier items. Multiple units can be stacked to make the most of a shed’s height).
- Overhead storage racks. Keep less-used paperwork or equipment out of the way in the ceiling void.
- Wall-mounted pegboards.
- Large cupboard or filing cabinet. Can store expensive equipment out of sight, and keep files and paperwork organised. A cupboard can be wall-mounted to leave space underneath for a radiator.
- Clear, stackable plastic storage boxes. Cheap and flexible, these keep everything dry and allow you to clearly see the contents. Useful for printer cartridges, old paperwork, cables and more.
- Hanging blocks (e.g. repurposed wooden pallets or wine crates). Fix hooks to the bottom to utilise all the space (e.g. for hanging wires, scissors). Or glue the lids of jam jars to the bottom of the blocks, fill the jar with rubbers, push pins, paper clips, etc. and screw into the lids.
- Desk. A drop-leaf or slide out desk will save space in the shed when not in use. A permanent desk can have storage boxes concealed beneath it.
- Back of door organiser (can be made of clear plastic, fabric, or even metal) for smaller items like stationary. Especially useful if your desk doesn't have drawers, saving surface area for work, rather than storage.
- Repurposed spice racks (either wall-mounted or for surfaces) are useful for smaller items, like glue, printer cartridges, small stationary items or pens.
- Wine rack (wall-mounted or free standing) for storing document tubes. Or wine.
- Rolling cart or trolley (with shelves, or concealed cupboard). Ideal if you work in multiple areas of shed.
- Chest or storage bench. Fix bulletin board to inside lid, add drawer that slides across the top (for office supplies - push pins, post its), with file storage in the main cavity (e.g. filing cabinet). Put a cushion on top, and it’s now a seat!
- Magnetic strips will hold metal objects from keys to scissors.
10. Decoration
How you decorate your office will depend on your personal taste, but here are some ideas to get you started:
- Paint the walls - Use bright, pale colours to maximise light in the space. If you’re staying neutral with the walls (white is a classic, light-enhancing choice), inject a splash of colour by painting shelving units or upcycling old furniture (e.g. a cabinet or plain wooden desk) to liven up the office.
- Framed posters or pictures.
- Add bookends on shelves. Organises lightweight books, etc. while also providing a splash of colour and style.
- Colourful pen holders, either purposefully bought or repurposed glass jars, tins or flowerpots.
- Magazine rack for storing brochures/ notebooks/clipboards, etc.
- Rugs for colour and comfort.
- Soft furnishings like cushions.
- Curtains or blinds will give you ambience, and help to hide the interior for extra security when you’re not there.
- Living plants will help create a better atmosphere in your office, as well as some natural decoration.
How to convert your shed into an office - quick summary
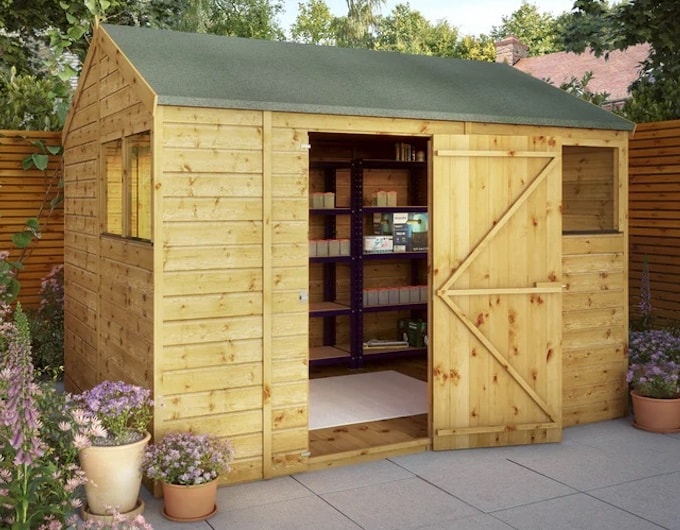
Image: 10 x 8 Shiplap Reverse Apex Wooden Shed from Waltons
- Start planning your ideal office. Create a list of everything you will use your office for. Then add a column to help you plan what those uses will require (Requirements).
- Design your office’s layout, experimenting with different ways to fit all your requirements into the space.
- Check the state of your current shed, as well as your chosen site, to see if there are any maintenance issues to deal with before the conversion starts.
- Make a detailed job list. This should help you establish which supplies and professional help you will need.
- Start the conversion with thorough damp-proofing.
- Install insulation in the floors, ceiling and walls of the shed.
- Fit the shed with electricity, using either mains or alternative sources (wind or solar).
- Install your choice of lighting (e.g. lamps, fluorescents, halogen or LED lights).
- Install freestanding, wall-mounted or underfloor heating. Connect your shed to the internet using either tethering, WiFi or a powerline adapter.
- Run water to your shed from the mains, or install a water butt and guttering system.
- Secure the contents of your shed.
- Decorate your new space.
- Bring in your furniture and storage.
More help

You should now be able to convert a new or existing shed into an office. Planning really is the most important stage. Be sure to use professionals for electrical and plumbing work to ensure your project conforms to building regulations.
Additional resources
- Get a solid foundation with our how to build a shed base guide
- Waltons help pages
- Waltons how-to guides
- Waltons blog
Visit waltons.co.uk if you’re looking for a new shed. If you need help finding the best model for your needs, call our expert team on 0800 029 1000.
Lead image: The Shore 5m x 4m Log Cabin from Waltons
