


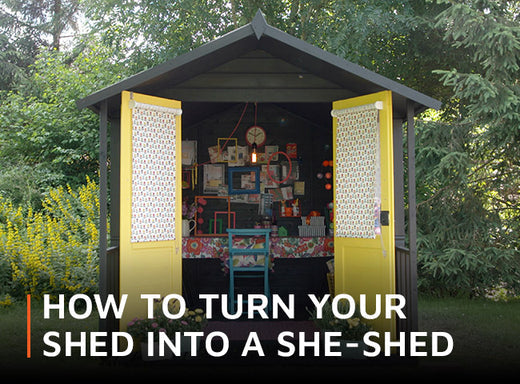
Many women dream of having a room that they can call their own. But not all homes have enough space to dedicate a whole room to luxury. With a little effort and some creative decorating, you could transform your storage shed into the stylish she-shed you’ve always wanted.
Here’s a step-by-step guide to help you to convert an existing or new wooden shed into a comfortable, warm and dry haven for reading, crafting or just relaxing with a glass of something nice.
Contents:
- How will you use your she-shed?
- How to plan the layout of your she-shed
- Should you convert an existing shed or buy a new one?
- How to project manage the conversion work
- 10 steps to convert your shed into a she-shed
- How to convert your shed into a she-shed - quick summary
How will you use your she-shed?
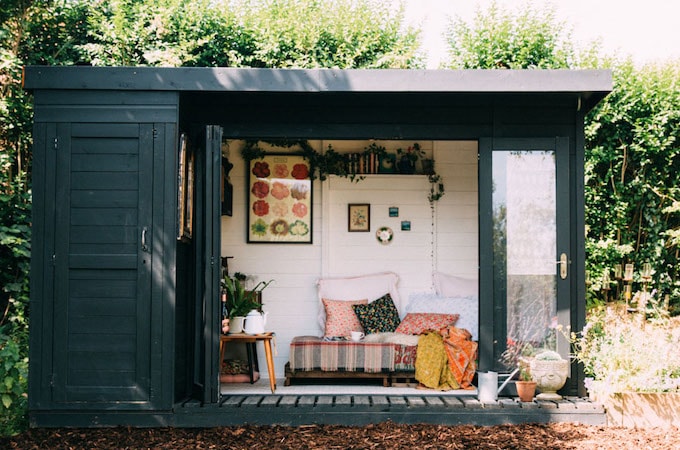
Image: Lobster and Swan
Before you begin, you’ll need to decide what you’d like to use your new she-shed for. For example, if you want to use your she-shed as a peaceful yoga studio, it will require quality flooring (such as hardwood, cork or bamboo), good ventilation and plenty of natural light. Here are some of the things you should consider:
- Furniture, storage, and accessories: Are you planning on using your she-shed as a space for your book club to meet? Then you’ll need to make sure you have enough space and furniture to accommodate them. If you’re going to get creative and crafty, you’ll need a desk, good lighting and plenty of storage for your equipment and materials. Do you want a fridge for drinks and snacks? Or just an area for storing bottles of wine and some glasses for when friends visit? Don’t worry about adding too much to your lists in the early planning stages. You can always drop things later on when you’re working on the layout.
- Utilities: Will you need electricity in your she-shed, or will your activities allow you to be off-grid? A yoga or pilates studio that is mainly used during the day might be fine with battery-operated lights. But if you want to use your she-shed as a home cinema space, connecting it to mains electricity is essential. If you do need electricity, think about how many power sockets you’ll need for heaters, lighting, computers, music systems, fridge, etc. Do you need access to mains water? Or an internet connection?
- Shed Base: To avoid structural issues further down the line, your she-shed will need a base strong enough to support both the structure itself and its contents. A concrete base is the best choice for larger sheds, or sheds used to store heavy equipment or furniture. If your shed is smaller and the contents fairly lightweight, a paving slab base is likely to be strong enough to support it. These are cheap and easy to install, but be realistic about the size and weight of your shed; a paving slab base can sink over time. Another lighter weight option is timber decking. This uses concrete anchor points and can provide extra damp-proofing. The gap between the decking and the ground allows for good air circulation. The deck can also be extended for a stylish alfresco area. But extra decking increases costs, both for construction and later maintenance.
- Position: Where in your garden should your she-shed go? Make sure there’s enough room to access all sides for ongoing maintenance. Assess the state of the surrounding garden. Are there any young trees that could obstruct light or access to your she-shed in the future? Consider the position in relation to your home. While some distance will help create a peaceful atmosphere, positioning it too far away may increase your costs when it comes to laying utility cables or accessing your home’s WiFi.
- Ventilation: Ventilation is important to prevent damp and keep the air fresh, especially if you’re using paints or solvents. Ventilation shafts or windows that open are easy options. But if your shed doesn’t have windows, consider installing a skylight and an extractor fan so that you still get your light and fresh air. This option has the added security bonus of shielding your shed’s contents from view.
- Aspect: Which direction will your she-shed face? Avid gardeners hoping to use the space for growing should position it so that the majority of the windows face south, to make the most of the natural light. You may also want to install bigger windows for this reason. Indirect light from the north, on the other hand, causes fewer shadows, which makes it easier for artists to see more clearly what they’re working on. Have a good look at the view from your shed. This is especially important if you’re planning to install large glass windows or doors. Will they offer the kind of view you want, or will they cause privacy issues due to proximity to neighbours? Take some time to ensure that the view from your home is acceptable as well.
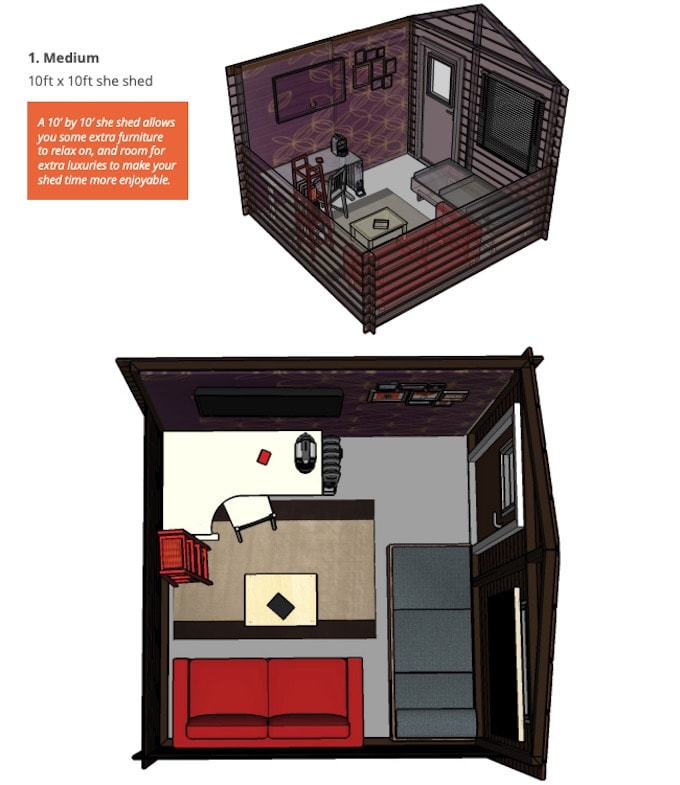
How to plan the layout of your she-shed
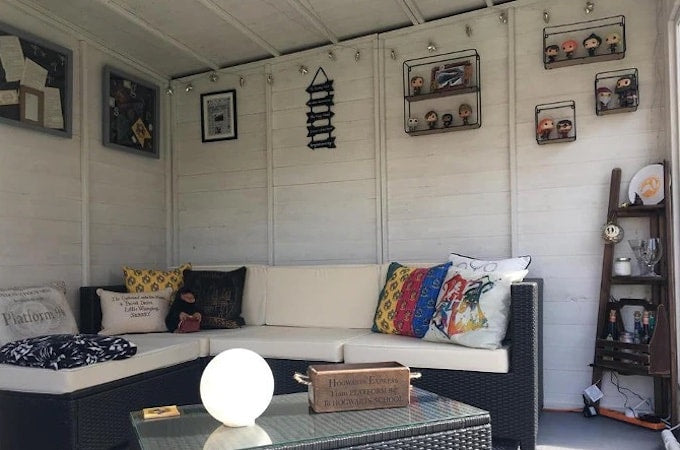
Customer story: Zoe’s ‘Harry Potter’ summerhouse
Once you’ve created your wishlist, it’s time to find out if everything you want will fit in. Due to the size of most sheds, a scale drawing is a good way to see what works best. You can do this on paper, or use free room-planning software like Floor Planner or Sketchup to create 2D or 3D versions of your proposed layout.
During this stage, you can also experiment with the structure of the shed itself. Move or enlarge the doors and windows, or even play around with adding rooms (if you’re considering building some), and try out different sizes of shed.
If you find that everything you want doesn’t fit inside your intended shed, either trim your wishlist or plan to invest in a bigger shed. But be realistic. Even with furniture, storage, and accessories, you still need to leave yourself enough room to move around in and enjoy the space.
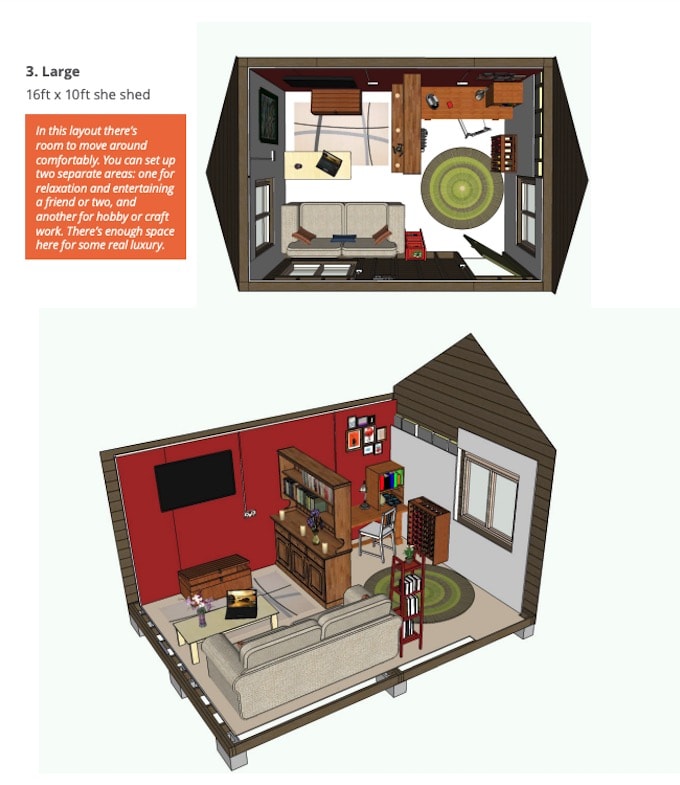
We’ve used Sketchup to create three examples of she-shed layouts for small, medium and large sized sheds:

Should you convert an existing shed or buy a new one?
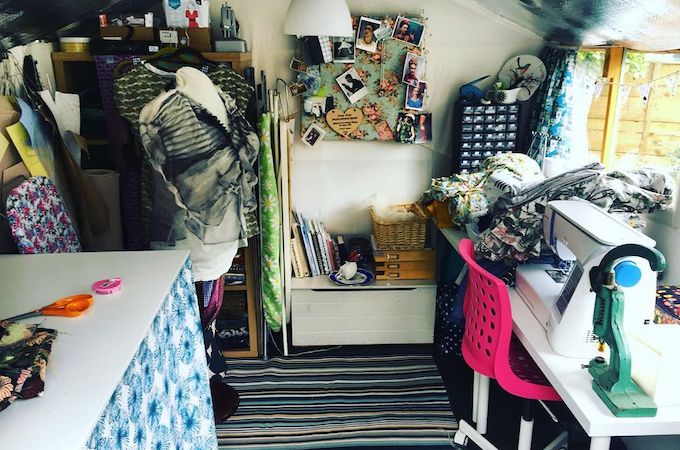
Image: @lazyseamstress
By now you should have a clear idea of what size and kind of she-shed you want. It’s time to see if your existing shed is fit for purpose.
Clear out the contents, and check the structure for any visible damage, such as damp or wood rot. Do windows and doors work properly? Are there any gaps that water could get through? Is the roofing felt intact? Are all the joins secure and watertight?
If you plan to keep this shed, then deal with any and all maintenance issues before the conversion begins. Also, check the base. Will it support the contents of your she-shed? Or will you need a stronger base, such as a concrete slab?
Take a good look at the site itself. Is the ground level? If not, you could shore up one side using timber and bricks. Or, cut into the slope and build a retaining wall. You may want to consult a builder to ensure the stability of any measures you undertake.
If you need to buy a new shed for your dream retreat, there are plenty of options. A wooden shed can be insulated, weatherproofed and wired for any necessary utilities. It can also be altered to better suit your requirements, including adding or expanding doors and windows. For added height (either for storage or more vertical room for exercise stretches), consider an apex shed. Or, if you want a building that tucks neatly against a wall or fence, a modern-style pent shed with a slanted roof may be more suitable. There are two main types of wooden sheds: those made from overlap panels, and those made from interlocking tongue and groove. Overlap is cheaper, but many choose shiplap tongue and groove for its strength and weather-resistance. For inspiration, browse the wide range of wooden sheds available at Waltons.
How to project manage the conversion work
Image: Shutterstock
A job list will help you proceed with the conversion in a smooth and efficient manner. If this is your first experience of project management, create a simple spreadsheet to keep on top of all the tasks.
At its simplest, you’ll need a column for each job, arranged into chronological order. If you want to make it more professional, add another column for who will do each job (you or a professional), and a column for how long each job will take.
For an all-singing and all-dancing project management spreadsheet, add columns for every day of the conversion project and shade the cells that indicate when each job will be done. We’ve created an example project management spreadsheet that you can copy and use as a template.
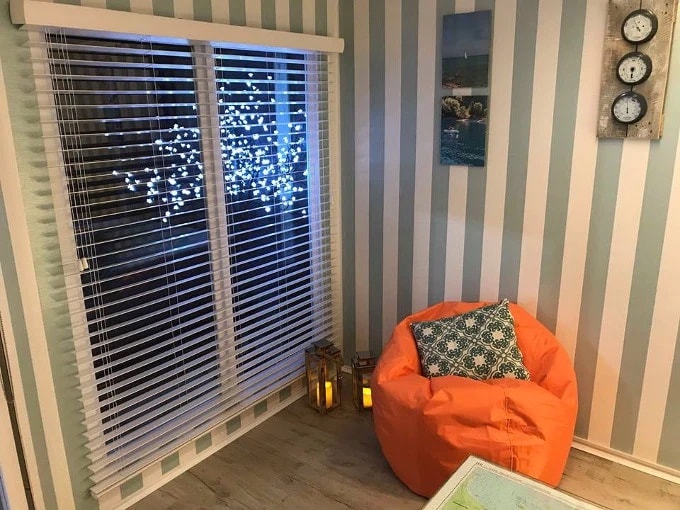
10 steps to convert your shed into a she-shed
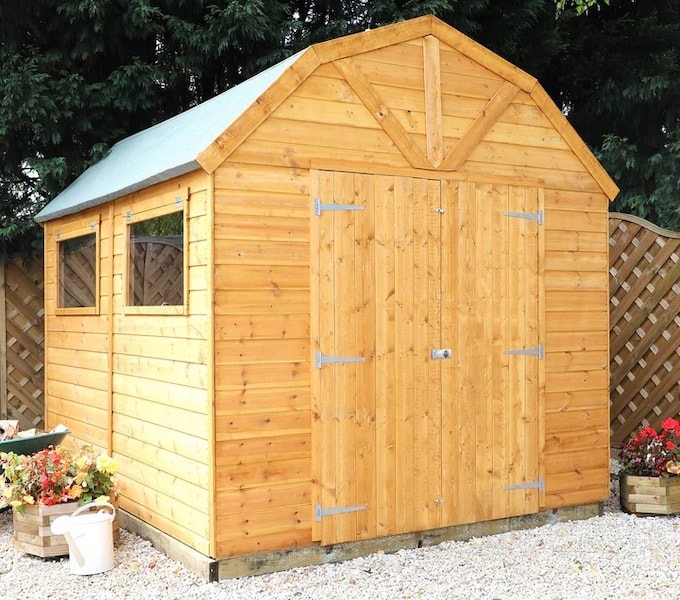
Image: 10 x 8 Premium Shiplap Dutch Barn from Waltons
1. Damp-proofing
Damp is your shed’s enemy. It’s caused by poor ventilation, leaks and condensation (when the air cools below the ‘dew point’ and the moisture it contains forms water droplets). One of the most important jobs you should do at the start of your conversion project is to damp proof your building:
- Remove or trim any plants touching or close to the shed’s exterior so that air can circulate properly.
- If you have a concrete base, fit a damp-proof membrane.
- Replace or repair your roofing felt.
- Seal the gaps in your window or door frames with an expanding, hardening foam filler or liquid wood.
- Treat the wood with preservative.
- Insulate walls, floor and roof.
- Install an insulating vapour barrier (or breathable membrane) when fitting insulation.
- Keep furniture away from outside walls where possible.
- Install heating (see below for more details).
If you’re using a concrete base, install a damp proof membrane which should help to prevent rising damp. If damp is a persistent problem, use a dehumidifier.
2. Insulation
Insulation will help ensure your she-shed is a warm and comfortable place to spend time. It also protects against damp and has sound-proofing qualities. That’s useful if you plan on loud activities (such as practising musical instruments or partying). For the best results insulate the walls, floor and ceiling and then cover the insulation with ply, plasterboard or tongue and groove.
There are many insulation options from which to choose:
- Fibreglass and rockwool are easy to cut to size and install. These offer good thermal and acoustic insulation but you’ll need to cover your eyes, mouth and nose properly, and wear gloves, when installing.
- Foam insulation boards, while expensive, are highly thermally efficient. The boards need to be cut to allow for sockets and wiring. Brands to consider include Kingspan and Celotex.
- Foam boards are also good for the floor, but if you want a cheaper, make-do method, try a breathable membrane topped with a rug or a carpet off-cut.
- Ceiling insulation needs to allow for a gap between the material and the roof to let any moisture escape. Consider natural and sustainable insulation (like hemp or sheep’s wool) which is flexible and breathable. Glass and mineral wool also work well.
3. Electricity
Any electrical work will need to be signed off by a qualified professional for insurance purposes. You might therefore consider engaging an electrician for the duration of the installation, even if you have the skills. Before your electrician arrives, make a list of all your she-shed’s electrical needs including the number and location of all the sockets you require. Keep in mind that you’ll need a 50cm deep trench to your she-shed to run the mains wiring.
If your electricity needs are light, you could consider solar or wind power. For example, if you’re planning to use it as a gardening shed mostly in daylight. But this is less reliable than access to the mains.
If you’re planning on renewable energy and want to maximise your power, the answer is a storage battery, a charge controller, and an inverter (if you need 240v). See our article on going off-grid for more information.
4. Lighting
The right lighting in your she-shed can serve both stylish and functional purposes. Give thought to whether you want overhead fluorescent or halogen lights, pendant lights, wall lights or lamps. A combination of these options might be best if you need both task and ambient lighting.
For a real statement, something unexpected like a chandelier is a fun choice. Fibre optic cables can also be used to create an atmosphere.
5. Heating
Installing proper heating will make your she-shed a comfortable place to spend time, regardless of the weather. It will also protect your shed and its contents from damp. If you have proper insulation, it should mean that heating your shed won’t be too expensive. There are several options to consider:
- Wood stove: A great source of heat and potentially carbon-neutral. Needs a professional to install, as well as fire-proofing of the surrounding area and a Carbon Monoxide alarm.
- Tube heater: Cost-efficient and space-saving, these are thin, safe and cheap to run. Mains powered.
- Halogen heater: Highly efficient, cheap heating. Can be placed wherever there’s a power supply within reach.
- Underfloor heating: Gives off steady, even heat, and often requires less energy than standalone heaters. Potentially more costly in installation and maintenance.
- Electric heater or portable radiator: These produce a decent amount of heat, but only to a small area. Heat may not reach all parts of the shed, leaving some areas at risk of damp.
- Electric radiator: Cheap and safe to run, but take up precious wall space.
- Electric convection heater: Can be freestanding or wall-mounted, featuring thermostats and timers.
Portable gas or paraffin heaters aren’t suitable for sheds due to the amount of condensation they cause. They can create moisture problems in the shed.
6. Internet
For more advice on connecting your shed to the internet, read our full article. For a quick summary, here are some of your options:
- Home WiFi: The amount of signal depends on how far the shed is from the main house (the further away, the weaker the signal).
- WiFi Extender: Can extend the reach of your home WiFi up to 30 metres.
- Tethering: Turn your phone into a WiFi hotspot and connect your laptop. Uses your phone’s data allowance.
- Powerline Adapter: Needs your shed to have mains electricity. Creates a second network and, once set up, an adapter in your shed becomes the source of the new WiFi signal.
7. Water
If you need a reliable supply of drinking water in your she-shed, you’ll need to connect it to the mains. But if you can get away with something less permanent, a water dispenser will provide you with chilled, bottled water when you need a quick drink. Alternatively, install a small fridge and fill it with jugs of water from your tap.
If you’re connecting your she-shed up to the mains water supply, you’ll need a 75cm deep trench for the new pipes for mains water (and wastewater). While similar to the trench for the electrics, the two must be completely separate and distinct from each other.
Consult a plumber for any work involving the water pipes, especially if you’re considering installing a bathroom in your she-shed. A bathroom will increase your construction and running costs, however, as you’ll need to run utilities to the bathroom (light, hot water, ventilation). You’ll also need to allow for the disposal of waste water. The further you are from the main house, the more expensive it will be to install a toilet. But if this is the case, an eco toilet (also known as a “dry” or “composting” toilet) is a viable alternative. They look like their conventional counterparts, but use either a filtering or incineration system to deal with waste.
If your water needs are just for taking care of plants, give some thought to a water butt and simple guttering. Many such systems come as a kit, making them easy to install.
8. Security
Storing expensive art, entertainment equipment, or tools in your she-shed could make you a target for thieves. But you can protect your shed, and its contents, by taking these security measures:
- Laminated glass windows: Strong, reinforced glass that will stay intact if hit with a hammer or brick.
- Alarm: Connect your she-shed to your home burglar alarm, or install an independent system.
- Security lights: The bright light can discourage thieves.
- Curtains or blinds will shield your shed’s contents from view.
- Locks and hinges: Consider reinforcing your shed door, particularly the area around the lock. Rim locks are more secure than pad bolts or hasp and staples. Too many locks, though, may alert people to the presence of valuables.
- Bolts: The rounded heads of coach bolts make it hard for thieves to unscrew and remove hinges and lock pads.
- Door: Consider a stronger, framed door with a Yale or mortice lock. Reinforce the door with sheet metal.
9. Storage
There are plenty of storage options for a she-shed, both stylish and functional. Consider the following:
- Shelves: On walls and in corners for books, DVDs and ornaments.
- Free standing shelving unit: For heavier items, or to avoid mounting shelving on shed walls. Can be covered with a curtain to minimise appearance of clutter.
- Wall-mounted pegboards for gardening tools, baskets for pens or craft supplies, hooks to hang cables from, etc.
- Large, lockable cupboard: Can store expensive equipment overnight, such as laptops or sharp secateurs, for security and safety reasons. Also useful for keeping bulkier items out of sight for aesthetic reasons, such as yoga mats and blocks. Wall-mounted cupboards can leave space for a radiator beneath them.
- Clear, plastic storage boxes: Keep everything dry and let you see what’s inside. Also cheap, and flexible.
- Hanging blocks, e.g. repurposed old wine crates or pallets. Hooks or jam jars can be affixed to the underside for storing smaller items, like cables, buttons, or USB keys.
- Apothecary chest: Good for seeds/jewellery/craft supplies/oil pastels.
- Entertainment centre: To house and conceal TV, computer screens, DVD player.
- Wine rack: Can be used for the obvious, or creatively for storing documents or other equipment.
- An old wooden ladder makes for creative shelving in a potting or crafty she-shed. Can be painted, distressed or left natural.
- Back-of-door organiser: For smaller items, stationery or art and crafting supplies, magazines or newspaper supplements.
- Upcycled spice racks: Hold rolls of ribbon or other craft supplies, small pots of paint.
- Rolling cart or trolley with shelves or a concealed cupboard. This can act as a moveable bar, or storing your essential items that can be moved around the she-shed.
- Chest or storage bench: Put cushions on top, and use it for additional seating.
- Magnetic strips: These can be used for items like scissors, small gardening tools, or keys.
- Vintage suitcases act as both decoration and storage.
- Wicker baskets can fit on shelves, or under furniture. Neutral and aesthetically pleasing.
10. Decorating your she-shed
By the time it comes to decorate your shed, you should have lots of ideas. But have you considered a theme? A theme can bring the whole look of your she-shed together. For example:
- French country: White, off-white or cream walls, muted gingham soft furnishings, rustic metal accents (e.g. lamps, or wrought iron bench/cushioned chaise-longue), painted wood furniture.
- Seaside: Pastel-coloured painted walls with a striped exterior, rope ball door stop, nautical-themed accessories (e.g. anchor wall hooks for hanging coats), lanterns and shells. Shutters on the windows will add a beach-hut feel.
- Modern, minimalist: White walls and floor, covered storage (e.g. storage benches, or cupboards), sleek metal accents in the lighting, such as industrial drop lights.
- Moroccan riad: Bold walls (e.g. purples, oranges, and pinks), coloured glass tea lights and patterned throw cushions create a North African vibe. Long flowing curtains around doors and windows help to bring out the Moroccan feel.
- Tea house/ Tearoom: Try Asian prints, bamboo, and rice paper screens for a Japanese tea house theme. Or, switch to floral soft furnishings, lace and a soft, pastel colour scheme for a British version.
- Retro: Bright, mid-20th century colours will make your shed stand out. Lots of contrast, and period furniture and accessories such as tables, radios and kitchen scales to establish the tone.
How to convert your shed into a she-shed - quick summary
Customer story: Havana's summerhouse
Here’s a quick summary of our guide to converting a new or existing garden building into the perfect she-shed.
- Start your planning. Brainstorm all the ways you might like to use your new space.
- Plan your she-shed’s layout based on available space and budget.
- Assess the state of your current shed, if you have one, as well as its location to determine if there are any maintenance or positioning issues to deal with before conversion starts.
- Make a job list detailing what and who you will need, and when, for each job during the process.
- Damp-proof the structure with wood preservative, breathable membranes and good quality roofing felt.
- Thoroughly insulate the shed’s walls, floor and ceiling. Cover with plasterboard, tongue and groove or ply.
- Install electricity via either the mains, wind or solar power. Fit the shed with proper heating.
- Connect your she-shed to the internet through your home. Use WiFi, a powerline adapter or even tether to your mobile.
- Fit your shed with a water butt and guttering, or connect to mains water.
- Secure the shed with sturdy locks.
- Furnish and install storage.
- Decorate according to your tastes.
More help
Image: Shutterstock
You should now be ready to convert a new or existing shed into a fabulous she-shed. Take time with the planning – it’s the most important stage. And be sure to use professionals for electricity and plumbing to ensure your project conforms to building regulations.
Additional resources
- Get a solid foundation with our how to build a shed base guide
- Waltons help pages
- Waltons how-to guides
- Waltons blog
Visit waltons.co.uk if your existing shed isn’t suitable for your dream retreat. If you need any advice, our expert team is happy to talk you through the options. Call them on 0800 029 1000.
Share:
How to turn your shed into a workshop
How to turn your shed into a man-cave