


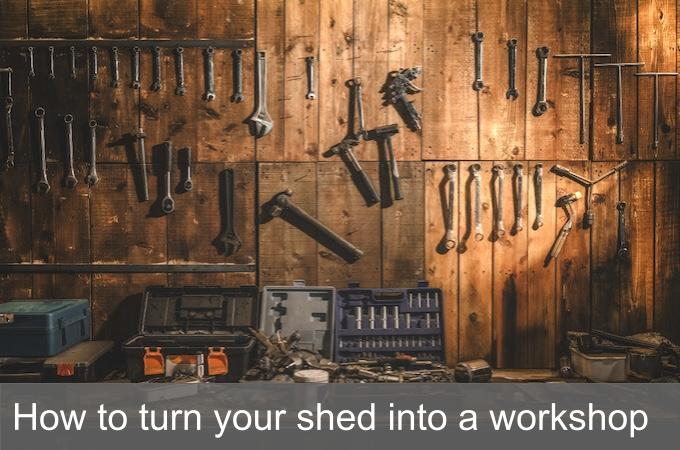
Having a dedicated workshop is many people’s dream, and a garden shed is the ideal place to set it up. With a solid base, damp-proofing, power and heating, an ordinary wooden shed can be transformed into a safe, warm and dry workshop fit for any metalworker, carpenter, craftsperson, mechanic or DIY fanatic.
If you’re looking for a step-by-step guide to help you convert an existing or new wooden shed into your own fully-equipped workshop, this guide will make it a reality.
Contents:
- How do you want to use your workshop?
- How to plan your workshop layout
- Should you convert an existing shed or buy a new one?
- Project managing your workshop conversion
- 10 steps to convert your shed into a workshop
- How to convert your shed into a workshop - quick summary
How do you want to use your workshop?

Image: Shutterstock
To begin, be clear about what you want to use your workshop for. Once you know that, you can draw up a list of requirements. For example, if you plan to use your workshop for painting or treating materials with chemicals, then you’ll require good ventilation. If you’re a woodworker and you want to be able to finish and dry your projects, then you’ll need a separate, dust-free area to do so. Here are some things to consider:
- Furniture, storage, and accessories: Do you need a table or a strong workbench of a certain size? What about somewhere to store your tools and accessories. Think about how you’ll use the space. What kind of seating do you need to work? Do you also want a separate chair to relax in? A fridge for food and drinks? Don’t be afraid of adding too much during early planning, as you can drop anything you like when you’re working on your layout. Once you’ve listed all your required furniture, tools and storage devices, ask yourself how and where you want to store everything. For example, should your workbench be near your tools and the window?
- Utilities: Electricity and heating are likely to be workshop necessities. Calculate how many power sockets you’ll need, allowing for electric heaters and free-standing lamps. Do you want exterior power sockets? Welding and angle grinding will be a fire risk indoors so you’ll need an outdoor covered hard standing and might want external power sockets for that. What kind of lighting will your work require? Will you need internet access, water or even gas?
- Design: Considering the weight and requirements of a workshop and its equipment, a shiplap wooden shed is your best choice. Overlap is cheaper, but shiplap tongue and groove tends to be sturdier, and more weather-resistant. With a wooden shed, you can install a strong concrete base and thoroughly insulate and weather-proof it for long-term use. Also, it’s easy to make alterations, for example, adding extra windows, or enlarging doors. If you need access into the shed for large equipment or materials then you’ll likely want double doors. And if you want lots of shelves, go for an apex roof which gives you extra height inside. See our full range of wooden sheds for inspiration.
- Shed base: Heavy duty work and hefty equipment like lathes and milling machines need a perfectly level floor and a strong, full concrete base.
- Position: If you’re buying a new shed or moving your existing one, where’s the best place to put it? What’s the largest size shed that your garden and budget will allow? Are there any trees that could inhibit light or access now or in the future? Is there anything that might obstruct natural light, like a fence or overhanging branches? Keep enough space between the shed and any walls, fences or vegetation to let air pass through and reduce damp inside. The further away from your main house the more peaceful your workshop. But it will cost more to lay cables for electricity and connect other utilities. And if you need an Internet connection, you might lose your home’s WiFi connection and need a new and more expensive way to get online.
- Ventilation: To help keep damp at bay you’ll want some form of permanent or trickle ventilation. If working with paints or solvent-based products, you’ll need extra ventilation, or at the very least, windows that open. Consider installing a skylight or an extractor fan.
- Aspect: Decide what direction you want your workshop, doors and any windows to face. Think about how to get the most of the type of light you want. While south-facing windows offer direct sunlight, indirect light from the north casts fewer shadows, making it easier to see what you’re doing. This is why artists’ studios often face north. Also, think about the view both from the shed and from your home.
How to plan your workshop layout
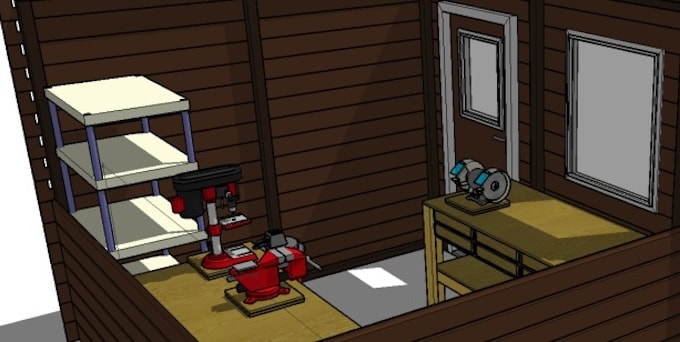
Once you’ve made a list of all your requirements, plan the layout of your new workshop to make sure everything fits. Create a scale drawing on graph paper or use free online planning software that lets you play with room size and furniture. Try Floor Planner or Sketchup to see what your workshop could look like. As well as trying different size sheds, you can also experiment with moving windows, doors and equipment around the shed.
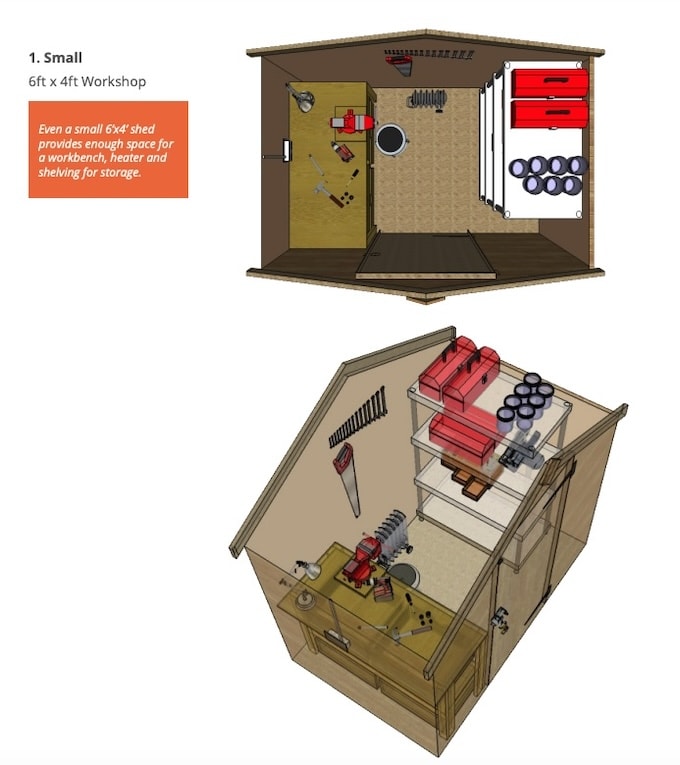
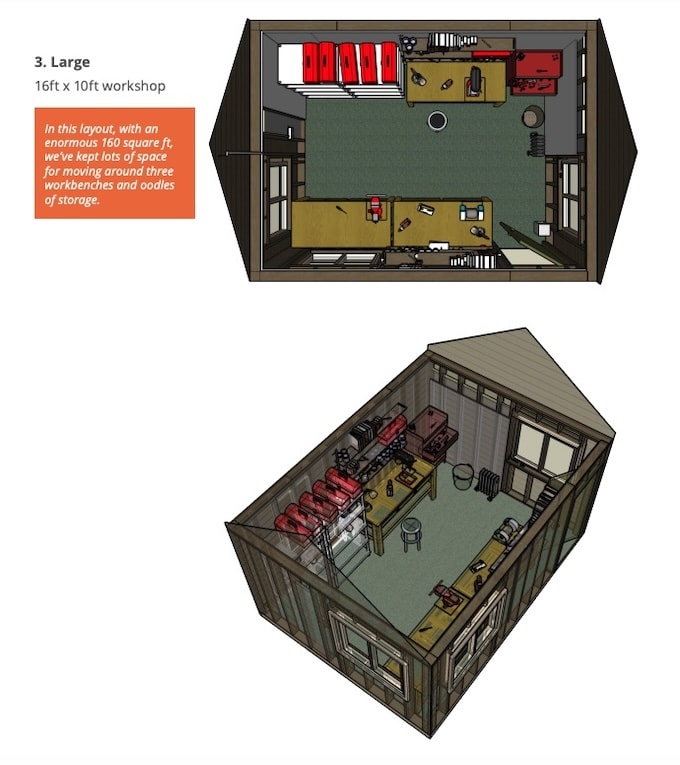
We’ve used Sketchup to create three examples of workshop layouts for small, medium and large sized sheds:

Should you convert an existing shed or buy a new one?

Image: 6 x 4ft shiplap reverse apex wooden shed from Waltons
Now you know exactly what type and size of shed you want, it’s time to find out whether your existing shed is up to the job.
- Empty your shed.
- Check for damage, rotten wood, water ingress and subsidence.
- Do the windows and doors work properly?
- Is the roofing felt intact? Are the joins watertight and secure?
- What base is it on? A gravel or timber base may not be strong enough for a workshop, and will more than likely need to be replaced with a concrete floor.
If you’re keeping the shed, then deal with all the maintenance issues before your conversion. If you think you’re going to have to move your shed, then take a good look at your possible new site. If you decide to buy a new one, check out our range of wooden workshops in a wide choice of sizes.
Project managing your workshop conversion

Image: Shutterstock
Now it’s time for some project management. If you don’t have access to or experience using project management tools, simply start by listing every job that needs doing on a spreadsheet. Add columns for how long each job might take and who’s doing the work. Next, organise everything into chronological order and add a column for each day of the project. Shade the cells of the days each job will be worked on.
This will help you track progress, make sure supplies for particular jobs are available on time, and book the electrician and plumber for the right days. We’ve made an example spreadsheet planner at http://bit.ly/waltons-conversion-planner that you can copy and use.
10 Steps to convert your shed into a workshop

Image: Shutterstock
1. Damp-proofing
Damp is your shed’s enemy. It’s primarily caused by leaks, bad ventilation, poor air circulation, rising damp and condensation (when the air cools below the ‘dew point’ and the moisture it contains forms into water drops). Here are some simple measures to help prevent damp in your new workshop:
- Make sure air can circulate around the outside of your shed. Cut back vegetation as required.
- Fix all leaks in the roof and walls.
- Install a damp-proof membrane if you have a solid concrete base
- Insulate walls, floor and roof.
- Apply an insulating vapour barrier (or breathable membrane) to walls.
- Install permanent and trickle ventilation so air can circulate.
- Keep furniture away from outside walls as much as possible.
- Apply a wood preservative.
- Install heating. If damp remains a problem, use a dehumidifier
2. Insulation
Insulating your shed will help keep your workshop warm and protect it against damp. It can also provide some soundproofing which is useful if you’ll be working with loud machinery that could disturb family or neighbours. Try to insulate the walls, floor and ceiling. Then cover your insulation with ply, plasterboard or tongue and groove. Here are some of the best insulation options:
- Glass and mineral wool (also known as fibreglass or rockwool respectively) comes in rolls, offers good thermal insulation and soundproofing. When installing, cover your eyes, mouth and nose properly, and wear gloves.
- Foam insulation boards, eg, from Kingspan and Celotex, are expensive, but highly thermally efficient. They can be used for floors and walls. Each board must be cut to size to allow for sockets and wiring.
- Natural and sustainable insulation like sheep’s wool or hemp is flexible and easy to install. It’s also breathable, which can help to prevent damp. Be sure to leave a gap between the insulation and the roof to let air circulate and moisture escape.
3. Electricity
It’s best to leave installing electricity to a registered professional. Even if you’re confident of your skills, you’ll still need to get your work signed off by a pro for your insurance to be valid. Help your electrician by having the following ready:
- Fuse box location.
- Number and location of required power sockets, inside and out.
- A list of the equipment you’ll be running.
- A clear path for a trench for the mains cable from your house to the shed.
You’ll need a 50cm deep trench from your house to the shed to run the wiring required for mains electricity. If your electricity needs are light, you could consider solar or wind power which could save money, for example, if you’re setting up a hand-crafting jewellery or carpentry workshop.
Power from the sun and wind is less reliable than mains electricity of course, especially during the winter months when you need light the most. The answer is a storage battery, a charge controller and (if you need 240V) an inverter. They take up space so make sure you have it spare. See our tips on going offgrid here.
4. Lighting
The right lighting will help you work in the evening and on dull days. Choose from:
- Fluorescent overheads – a fairly cheap and energy efficient way to get bright light spread across your whole workshop.
- Halogen – bright light that’s good for detailed and delicate projects. Can be used as spotlights and moving track lights, which can be redirected.
- LED lighting – versatile, cheap to run, and essential for a 12V system. A popular choice for those working on machinery.
- Lamps – Cheap and flexible option but they take up floor or bench space and might not be bright enough.
5. Heating
Properly heating your workshop ensures that it’s a comfortable place to work into the night and all year-round. It will also help stop your tools and equipment from degrading or rusting. If your shed is well-insulated, it shouldn’t cost too much to keep the space above the dew point. Either install permanent heating in your shed, or use portable heaters that can be moved around. Here are some of your options:
- Tube heater. Thin, tube-like heaters that are simply plugged into a wall socket. They take up little space and are safe and cheap to run.
- Underfloor heating. Maintains a steady temperature evenly across a shed. Often requires less energy than standalone heaters, but is more expensive to install. Any maintenance issues may require the floor to be pulled up.
- Electric heater or portable radiator. Safe, and good for a quick blast of heat, but they’re not efficient. The heat may not extend to all parts of the workshop leaving some areas (and equipment) at risk of damp.
- Electric radiator. Safe, convenient and cheap to run, especially with a thermostat. However, they’re wall-mounted and so take up precious space.
- Halogen heater. Cheap to run, and highly efficient heating. Can be placed wherever there’s a power supply within reach.
- Electric convection heater. Either freestanding or wall-mounted, these are cost-effective to install and maintain. Some models feature thermostats and timers.
- Wood stove. Needs a qualified professional to install. Thorough fireproofing of the surrounding area and flue and vent will raise costs. Needs a lot of space, but is a great source of heat and can be carbon-neutral.
- Avoid portable gas or paraffin heaters. They give out a lot of heat but can also cause condensation problems.
6. Internet
There are several different ways to connect your workshop to the internet:
- Home WiFi if the signal is strong enough. The further you are from the house, the weaker the signal will become.
- Tether your mobile phone to your laptop, which then uses your mobile’s signal and data.
- WiFi Extender to boost an existing WiFi signal and extend its reach up to 30 metres.
- Powerline Adapter to create a secondary network, built on your home’s existing network. This works via your home’s mains electric circuits, and needs your mains electricity to extend to your workshop. Once set up, an adapter plugged into a socket in your shed is the source of the new WiFi signal.
7. Water
Connecting water to your workshop is relatively straightforward. To use mains water, you’ll need to dig a trench to the shed for new water pipes. They need to be installed below the frost line and, where they surface, be properly insulated from the cold. A plumber will advise but as a guide, service pipes need to be dug to a minimum depth of 75cm.
While similar to the trench needed for the electrical wiring, the two must be separate and at a distance from each other. The waste water pipe can run in the same trench as the mains water pipe.
If you don’t want to install plumbing, and don’t want drinking water, then consider using a water butt instead. Some simple plastic guttering can collect the water from the roof of your shed. It’s easy to install, and many water butts come as a kit with a base, tap assembly and downpipe diverter included.
8. Security
Leaving your tools and equipment in your workshop could make you a target for thieves. No shed will be 100% secure, but the following measures help to keep your valuables safe:
- Make your garden difficult to get into and most opportunistic thieves will be put off.
- Choose a shed with smaller, or no, windows, meaning less can be seen.
- Fit curtains or blinds to hide your valuables and help avoid opportunistic break-ins. Hide expensive tools in secure boxes.
- Consider a more secure framed door which allows a mortice or Yale lock. You might reinforce the door with sheet metal, especially the area behind the lock.
- Rim locks are more secure than a hasp and staple or pad bolt. Beware: using many locks can signal the presence of valuables.
- Coach bolts with rounded heads make it hard for thieves to unscrew hasp and staples, lock pads and door hinges.
- Wire your workshop into your home burglar alarm, or install an independent system.
- Install motion-sensitive, bright outdoor lights to put off would-be thieves and help you in the dark.
- Make sure your shed contents are insured.
9. Storage
Smart storage makes it easier and more pleasant to work in your shed. Here are some ideas to consider:
- Shelves on walls and in corners.
- Overhead storage racks.
- Wall hooks to keep your most frequently used tools close to hand.
- Hooks on the ends of shelf units, cupboards and workstations.
- Wall-mounted pegboards to hold individual tools.
- Pegboard ‘slides’ that glide out vertically from under your desk or workbench.
- Magnetic toolbars for small items like drill bits, nails, and screws, as well as bigger tools.
- Large lockable cupboard to keep expensive or dangerous tools out of sight and reach. Wall-mount to create space underneath.
- Clear, stackable plastic storage boxes are a cheap way to keep everything dry, while also allowing you to see what’s inside.
10. Decoration
A coat of white paint inside is a good starting point for decorating a workshop, as it makes it easier to see your work and reflects the light. But make sure the outside is also protected with a couple of coats of wood treatment or paint.
On the walls, hang pictures that inspire you, whether they’re professional diagrams or movie posters. For a practical decoration, consider a bulletin board or whiteboard, both ideal for notes, reminders and working out ideas.
If you’ll be standing up for a long time then install anti-fatigue mats. Or consider using a rug (or carpet remnant), which will double as both decoration and an added layer of floor insulation.
How to convert your shed into a workshop - quick summary

Image: 14ft x 10ft Premium Shiplap Apex Workshop from Waltons
- Decide the main uses for your workshop.
- Plan your workshop’s layout based on your requirements and the available space.
- Assess the state of your current shed and the site you want to use.
- Make a chronological list of jobs showing who will do what and when.
- Start the conversion with damp-proofing.
- Insulate walls, floor, and ceiling. Cover with ply, plasterboard or tongue and groove.
- Install electricity via mains, solar or wind power.
- Install lighting, choosing from fluorescent, halogen, LED or lamps.
- Install heating, choosing from tube heaters, under-floor, portable radiators, convection heaters or wood stoves.
- Connect your shed to the internet via WiFi, mobile tethering, or powerline adapters.
- Connect to running water via the mains or a water butt.
- Make your shed secure.
- Install your chosen storage. Then move in equipment and tools.
- Decorate to your personal taste.
More help

Image: Shutterstock
You should now have everything you need to convert your shed into a workshop. Always use professional plumbers and electricians to ensure your project conforms to building regulations.
Additional resources
- Get a solid foundation with our how to build a shed base guide
- Waltons help pages
- Waltons how-to guides
- Waltons blog
Visit waltons.co.uk if your existing shed isn’t suitable for your dream workshop. If you need any advice, our expert team is always happy to help. Call them on 0800 029 1000.
Share:
How to turn your shed into a she-shed