


Are you a budding potter, or a professional artist with no room to work at home? Converting your boring storage shed into a fully equipped studio could be the perfect solution. A shed can be thoroughly protected against the elements, as well as wired for all the necessary utilities, making it a comfortable, dedicated space to work. It can also be altered and decorated to suit your exact preferences.
For practical tips on transforming your shed into a creative hub, follow the advice in this article.
Contents:
- How will you use your arts and crafts studio?
- How to plan the layout of your new craft studio
- Convert an existing shed or buy a new one?
- How to project manage your new craft studio
- 10 steps to convert your shed into an arts and crafts studio
- How to convert your shed into a craft studio - quick summary
How will you use your arts and crafts studio?
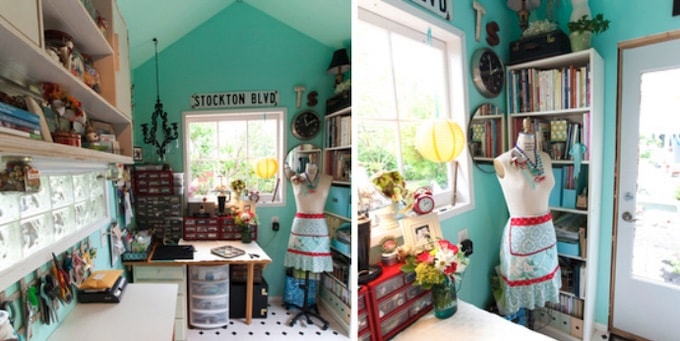
Image: Tippy Stockton
What do you want to use your arts and crafts studio for? Planning how you’d like to use the space will help you work out what jobs you’ll need to do. For example, if you plan to use your shed as a painting studio you’ll require good ventilation (e.g. windows that open, a ventilation fan, or shaft) and plenty of natural light (so either big windows in the shed walls, or a skylight). Here are some things to consider:
- Furniture, storage, and accessories: Your furniture requirements should easily flow once you know what kind of studio your shed will be. For example, if you’re a sculptor, then you’ll want an area to sculpt in, and a separate, clean area for leaving your finished pieces. If you’re a jeweller who uses equipment with heating elements in your work, then you’ll need a workbench that’s either made of metal or that has been flame-proofed. You’ll also need storage space for your tools and materials (e.g. soldering iron, beads, silver, etc.), including any equipment, such as a casting machine or polishing motor. Think about how you’ll use the space. What kind of seating does your work require? A stool for working at your easel, or a comfortable armchair to knit in? Do you want a kettle for making hot drinks? Don’t censor yourself too much during early planning. The time for trimming your list comes later when you’re working on the studio’s layout.
- Utilities: Heating and electricity may be essential for your work. For example, for powering a sewing machine or potter’s wheel. Or running a small heater to keep your materials from getting damaged by damp. Figure out how many power sockets/light switches you need (both inside and outside the studio). Also think about what kind of light you’ll need. Does your work require you to have access to running water (e.g. for a darkroom or pottery)? Or would access to filtered, non-drinking water from a water butt suffice for cleaning brushes and palette knives? Will you want or need access to the internet in your studio?
- Design: Your requirements may well mean you need to buy a new, or bigger, wooden shed. Wooden sheds lend themselves to structural changes, such as installing double doors or bigger windows. There are two types of exterior cladding for wooden sheds: overlap or tongue and groove cladding. While overlap is cost-effective, tongue and groove is stronger and more weather resistant. See the full range of wooden sheds from Waltons for inspiration.
- Base: The type of foundation you will need depends on the weight and size of your shed and its contents. If your shed is large, or you plan to use or store heavy equipment or furniture in it, a concrete base may be the best choice. For smaller or lighter weight sheds, a paving slab base may be suitable. But a paving slab base can sink over time, so be realistic about your shed’s size and weight.
- Position: When figuring out where you have space in the garden for your studio, add a few extra inches to the shed’s dimensions. You will need this space when digging out for the base, as well as for any future maintenance. Assess the surrounding garden. Are there any young trees or shrubs that could grow to block light or access to the studio? Keep the distance from the main house in mind. While some distance will ensure peace and quiet in your studio, the further away it is, the more costs you may incur when installing utilities. For example, your home WiFi signal may not extend that far, and it will cost more to lay the electricity cables/water pipes.
- Ventilation: Small windows in the shed - or no windows at all - will shield any expensive kit from view. But make sure your space is well ventilated. This is especially important if you’ll be working with paints or solvent-based products, or with any machines/equipment that could release fumes (e.g. glass bead making or metal-working). Appropriate ventilation can be achieved through the use of windows that open, either in the walls, or as a skylight. An alternative is to install a vent in a wall, or to fit an extractor fan.
- Aspect: The direction that your studio will face depends largely on the quality and amount of light you will need. Windows or French doors that face the south will have the benefit of direct light, but the indirect light from the north causes fewer shadows, which makes it easier to see what you’re doing. North-facing light is also more even, unlike the frequent changes and shadows given by direct light. Many artists choose studios with north-facing windows for this reason. Also, give some thought to the view from your shed (important if you are planning to paint/ sketch or otherwise capture that view in your work), as well as from your home.
How to plan the layout of your new craft studio
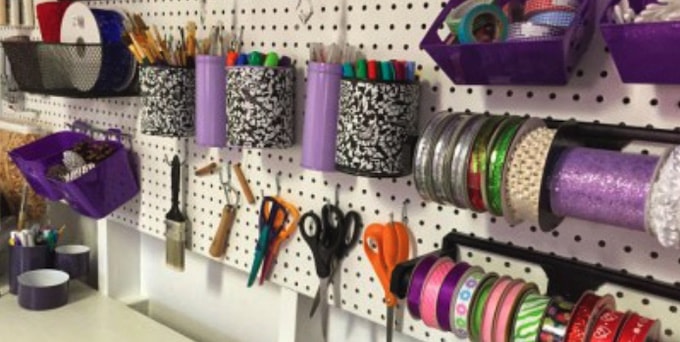
Image: CraftLovely.com
Before you begin, having a clear plan for your new arts and crafts space is very helpful. There are several ways to design your dream space:
- Paper and pencil. Draw a to-scale picture of your empty shed. Make and cut out scale versions of potential furniture and move them around.
- Google Draw. This free software lets you create scale versions of your shed and its contents, which you can easily move around and adjust.
- Room Planning Software. Using free online room planners, like Floor Planner or Sketchup, you can set room size and position furniture in either 2D or 3D.
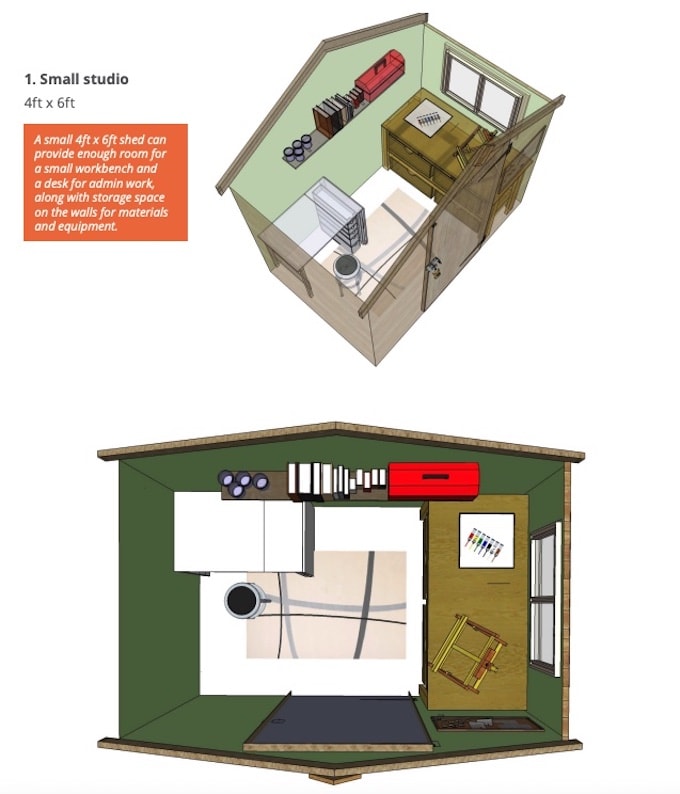
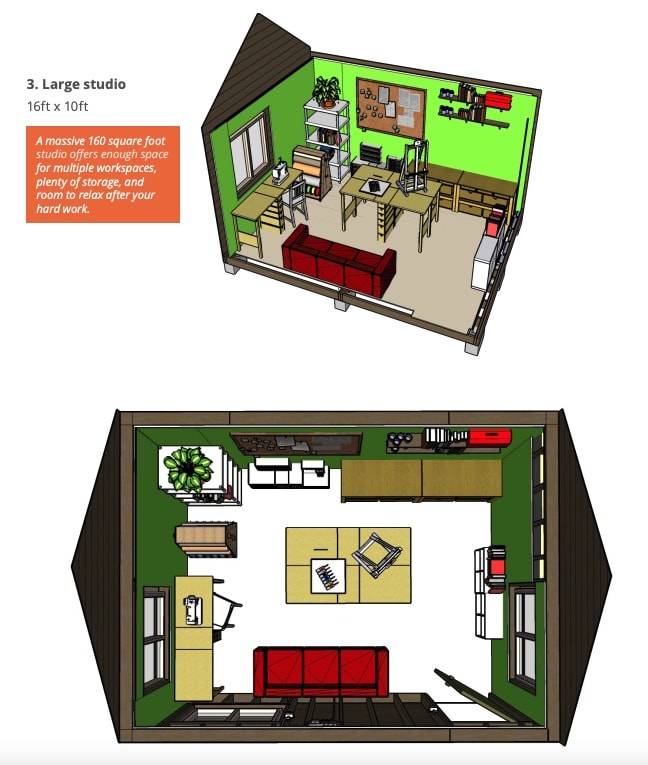
Over the next few pages you’ll see three example arts & craft studio layouts (made with Sketchup) for these size sheds:
- Small (6ft x 4ft)
- Medium (10ft x10ft)
- Large (16ft x10ft)

Convert an existing shed or buy a new one?
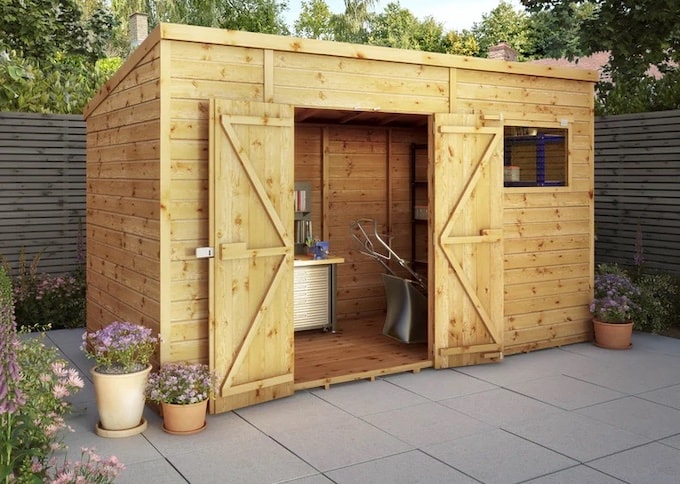
Image: Waltons
If your requirements don’t comfortably fit inside your current shed, you have two options: invest in a larger shed, or scale back your plans to something that can be accommodated. But if you’re converting an existing storage shed, you’ll need to assess its condition to make sure it’s up to the task.
Empty your shed and check it thoroughly for any visible damage, including subsidence and water ingress. Do the doors and windows function properly? Pay attention to the roof and the base. Is the roofing felt intact? Will the existing base be strong enough to support your proposed studio or will you need to upgrade to a solid concrete base? Any structural or maintenance issues will need to be dealt with before the conversion starts.
If you’re installing a new shed, take a good look at your studio’s intended site. If you’re lucky, the ground will be level in the spot you’ve chosen. If not, you can counter the slope using timber and bricks, or by cutting into it and building a retaining wall. Either way, you may want to consult a builder to ensure its long-term stability.
How to project manage your new craft studio

Customer image: Jeanette A
The final thing to do before you start work is to create a job list. Use a project management tool to help you move through the process smoothly and efficiently. If project management tools are new to you, a simple spreadsheet should help you track your progress.
- Make a list of every job that needs doing in a new spreadsheet.
- Add columns for how long each job might take; and who is doing the job (you, friends, or a professional?)
- Roughly put the jobs in the order you think they need to be done.
- Add columns for: Preparation (e.g. jobs that need doing before the conversion starts); and the days of the project (e.g. day 1, day 2, day 3, etc).
- Colour the corresponding spreadsheet cell of the day you plan to do each job.
- Swap out “day 1” and “day 2” with the actual dates when you know them.
Need more help? We’ve created a basic project management template for you to copy and use as required.
10 steps to convert your shed into an arts and crafts studio

Image: Shutterstock
1. Damp-proofing
There are several straightforward measures you can take to damp-proof your studio at the start of the conversion.
- Fit the walls with an insulating vapour barrier (or breathable membrane) when insulating.
- Install heating.
- Make sure there are no garden plants, bushes or trees pressing against your shed.
- Fix (or replace) the roofing felt if there are problems.
- Use liquid wool or an expanding, hardening foam filler to seal any gaps in the window or door frames.
- Apply wood preservative to the structure (this should be re-applied on an annual basis).
- If you’re installing a solid concrete base, you should also plan to include a damp-proof membrane.
- If damp continues to be a problem, use a dehumidifier.
2. Insulation
Proper insulation in the shed’s walls, ceiling and floor ensure that your studio remains in good long-term condition. Many types of insulation have sound-proofing abilities as well, which is useful if you’ll be working with loud machinery or to the sound of loud music. It also provides another layer of damp-proofing. Here are some of the best ways to insulate your shed:
- Plain or foil-coated bubble wrap. A cheap and simple option. But you get what you pay for. Bubble wrap isn’t the best insulator, and is only really effective when the foil layer is air-facing, which it won’t be here. Consider one of the following:
- Glass or mineral wool (also known as fibreglass and rockwool respectively). These both offer good thermal insulation and soundproofing (for walls and ceiling). They’re easy to install, but make sure you wear protective gear to work with them.
- Foam insulation boards (for walls and floor) from brands like Kingspan and Celotex are costly, but efficient. You’ll need to cut in gaps for utilities and sockets.
- For the floor, a breathable membrane topped with a rug (or carpet remnant) is a cheap, make-do measure for an existing shed. If you have a larger budget for this, foam insulation boards are very effective insulators.
Be sure to leave a gap between the insulation and the roof to let moisture escape. Any insulation in your shed can then be covered with ply, plasterboard or tongue and groove.
3. Electricity
It’s best to get a registered professional to connect your studio to mains electricity. Even if you have the skills, they will need to sign off on any electrical work done on the shed for insurance purposes. Any electrician you hire will need the following information before pricing up the job:
- A comprehensive list of the equipment you want to run
- Number and location of intended power sockets/light switches (both inside and out)
- The location of the fuse box
To run mains electricity to your shed, you’ll need a 50cm deep trench to your studio from the house for the cabling. Consider solar or wind power if your electricity needs are light. For example, if you’re setting up a hand-crafting jewellery studio, or an art studio that you will only use during the day. However, this is less reliable than access to the mains, especially during the winter months when you need the most heat and illumination. For more information, read our article on how to power your shed off-grid.
4. Lighting
While natural light is vital in an arts and crafts studio, choosing the correct artificial lighting will also help you work, especially during the evenings and on dull days. Think about:
- Fluorescent overheads. Provides bright, cheap, energy efficient light across the whole space. Also gives clean, cool quality of light - probably closest to north light, which many artists prefer.
- Halogen or LED lighting. Both bright sources of light. The bulbs are especially popular in adjustable spotlights and track lighting because they can be repositioned and redirected depending on where you need light the most in your studio. Also fairly cheap to run.
- Lamps. Give warm quality of light, but may not be very bright. Cheap and free to install (wherever you need them). Require either floor or surface space. Art studios should avoid incandescent bulbs (the light is too yellow) and opt for compact fluorescent bulbs instead. They are more energy-efficient and offer a brighter light with more colour control. These bulbs would also be good installed overhead.
5. Heating
Proper heating in your studio will make sure it’s a comfortable place to work all year-round. It will also protect your materials and tools from damp. You’ll need to heat your shed to at least the dew point (the point at which moisture condenses on cool surfaces), which shouldn’t be too costly to achieve if the shed has been properly insulated. Consider the following:
- Wood stove: Great source of (potentially carbon-neutral) heat. Will require installing by a professional (stove, flue and vent), as well as thorough fire-proofing of the area, which can be costly.
- Underfloor heating: Provides steady, even warmth across a shed. Can be more expensive to install and maintain than standalone heaters, but often requires less energy.
- Halogen heater: Cheap and efficient heating. Can be placed wherever there’s a power supply within reach.
- Tube heater: Safe for small spaces, these thin tubes just need an electric socket to run.
- Electric heater or portable radiator: Safe to run, but not efficient. Radius of heat is small, meaning it may not reach all of the shed, leaving some areas at risk of damp.
- Electric radiator: Convenient (especially with a thermostat), safe and cheap to run. But wall-mounted so will permanently take up space.
- Electric convection heater: Can be freestanding or wall-mounted, and often feature thermostats and timers. Cost-effective to install and maintain.
Portable gas or paraffin heaters should be avoided. They give off a good amount of heat, but it causes condensation, leading to damp.
6. Internet
Internet connectivity in your shed can be achieved in the following ways:
- Home WiFi if the signal reaches your studio. But it will get weaker the further you are from the house.
- A WiFi Extender can boost your home WiFi signal up to 30 metres.
- Tethering your laptop to your mobile will let you use the mobile’s signal and data.
- Powerline Adapter to create a second network in your shed. This will need your shed to be connected to the mains. Once set up, the new WiFi signal will come from an adapter plugged into a socket in your studio. For more information, read our article on how to connect a garden shed to the internet.
7. Water
Accessing water in your shed can be achieved by connecting to mains water. Alternatively, if you don’t require drinking water, you could simply add a water butt and guttering.
Much like installing the electricity, a deep trench (at least 75cm) will be needed to lay the new pipes for mains water (and waste water) below the frost line. But the two trenches for each utility must be completely separate and distant from each other.
Consult a plumber for any work involving the water pipes, especially if you’re considering installing a bathroom in your studio. Keep in mind that a bathroom will increase your costs due to running utilities to the bathroom (light, hot water, ventilation), as well as the disposal of waste water.
The further a toilet will be installed from the main house, the more it will cost. But an eco toilet (also known as a “dry” or “composting” toilet) is a viable alternative. They look like their conventional counterparts, but use filtering or incineration systems, rather than the more costly pumping system.
If you need water for cleaning brushes or other equipment or accessories but not for drinking, a water butt and guttering may suffice. Many systems come in kit form, and are easy to install.
8. Security
Leaving your materials and equipment at the bottom of the garden may make you a target for thieves. But a few simple security measures will help protect your studio and its contents:
- Locks and hinges. Reinforce your shed door - especially the area behind the lock - with sheet metal. And replace your shed’s existing hinges with coach bolts with rounded heads; these can’t be simply unscrewed so they prevent a thief from removing the door in its entirety to gain entry.
- Laminated glass windows. Strong glass like this won’t shatter when hit with a solid object, like a brick.
- Alarm. Connect your studio to your existing home alarm system.
- Motion-sensitive security lights can put off would-be thieves.
- Curtains or blinds shield the interior of your studio from view and help avoid opportunistic break-ins.
- Garden. The more difficult your garden is to get into, the harder it’ll be for opportunistic thieves to get in and out.
9. Storage
There are plenty of creative storage options to consider for your studio. For example:
- Wall-mounted shelves or open shelving units (can be covered with a curtain to hide clutter).
- A wooden ladder can be used as creative shelving (painted or distressed for decorative effect).
- Overhead storage racks. Store little-used items firmly out of the way – but make sure you can get to them when you need to.
- Wall-mounted pegboards for tools, craft supplies, etc. Pegboards can also cover entire walls.
- Large cupboard. Useful for storing expensive (or dangerous) equipment overnight (such as laptops, soldering irons, solvent-based substances, etc.) for security and safety reasons.
- Clear, stackable plastic storage boxes. Cheap and flexible. Contents are kept dry and easily visible.
- Hanging blocks for use as shelving units. Hooks or jam jars can be affixed to the underside for storing smaller items, like buttons, pins, chalk, etc. Consider upcycling old wine boxes or pallets.
- Apothecary chest for craft supplies/oil pastels/sew-on patches.
- Back of door organiser for smaller items, like art supplies, knitting needles or wool.
- Upcycled spice racks (either wall-mounted or freestanding) for rolls of ribbon, small pots of paint.
- Rolling trolley. Useful if there are items you want to use in multiple areas in the studio, e.g. paint brushes, sewing needles, masking tape.
- Chest or storage bench. General storage underneath. Pop a cushion on top, and you’ve got extra seating!
- Magnetic strips for scissors, metal knitting needles, keys, pallet knives and other small metal tools.
- Wicker baskets fit on shelves, or under furniture. Neutral and aesthetically pleasing.
- Wall-mounted towel rail/toilet roll holder for rolls of ribbon/tape/cord.
10. Decoration
Have fun choosing colours for your studio - but make sure you keep things light so you can see your work properly. Your own work – whether it’s a painting-in-progress or your latest quilt – will be amazing decoration. But for more general ideas, consider the following:
- Paint the walls – light colours brighten a space. Paint shelves or furniture to add bright pops of vivid colour instead of adding it to entire walls.
- Add a statement wall if you like plenty of colour, but be careful not to overwhelm the space, especially if your own work is very visual, like painting.
- Hang your original artwork, or framed posters and photographs that inspire you. Perhaps some mounted embroidery, or a tapestry?
- Wall-mounted cork boards or whiteboards to keep track of ideas and notes, as well as for mood/inspiration boards.
- Create a blackboard with blackboard paint - use it to paint a circle on the wall or the sides of a cabinet.
- Rugs can add colour and comfort, and will also act as an insulating measure. Art or sculpture studios may be better off with a lino floor.
- Artwork and ornaments, like small sculptures, framed pictures, or collections of small objects like thimbles, figurines or shot glasses.
- Soft furnishings, cushions and curtains/blinds (which will help with security and warmth!). Either purchased or handmade.
- Plants. Chrysanthemums, spider plants and African violets will add freshness to the look of your studio, as well as helping to keep the air clean.
- Doormat. Helps to keep the garden mud out, and the comfortable feel in.
How to convert your shed into a craft studio - quick summary

Customer image: Ebony K.
- Thoroughly plan how you want to use your new arts and crafts space.
- Design the layout of your studio before you begin, experimenting with the location of furniture and equipment, as well as doors and windows.
- Check your existing shed for any damage.
- Make a job list, detailing each task that will need to be done, as well as who will do it.
- Start the conversion by damp-proofing your shed.
- Insulate the walls, ceiling and floor.
- Get an electrician to wire your studio for mains electricity. Or install an alternative, such as wind or solar power.
- Fit the studio with your choice of lighting.
- Install the heating (via electric heaters, underfloor systems, or a wood stove).
- Connect your shed to the internet.
- Supply the studio with water, if needed.
- Secure your shed with reinforced doors, locks, and hinges, as well as strong glass in the windows and motion-sensor lights.
- Move your storage and furniture into the studio.
- Decorate in your own unique style.
More help

Image: Shutterstock
You should now have all the information you need to transform a new or existing shed into a dedicated arts and crafts studio. Spend plenty of time planning – it’s the most important stage – and use professionals for electricity and plumbing to ensure your project conforms to building regulations.
Additional resources
- Get a solid foundation with our how to build a shed base guide
- Waltons help pages
- Waltons how-to guides
- Waltons blog
Visit waltons.co.uk if your existing shed isn’t big enough for your needs or suitable for conversion. If you need any advice, call our expert team on 0800 029 1000.
Share:
How to turn your shed into a man-cave
How to turn your garden shed into a summerhouse